- SEO
How to Make A Google Web Story
•
Eric recently told you about Google Web Stories — a fun and actionable way to get new readers to your site through Google Discover, a feed reader anyone can use. Today I’m going to teach you how to make one.
As an avid Android user, Google Discover is one of the main ways I consume content on a daily basis because Discover is a curated collection of articles from around the web that Google’s algorithms know I will be interested in.
This is all based on my search habits, the things I ask Google Assistant or sometimes even say around my phone.
It can be amazingly useful at times, especially when I’m bleary-eyed but I want to make pancakes for my kids at 7 a.m. If I talked about it the night before, it’s likely a few web stories about pancakes will be in my Google Discover without me ever having to type a search term into my browser.
And my favorite thing about Google Discover? Seeing Web Stories of content I haven’t read yet, from bloggers I know and love. (Psst that’s you.)
Stories aren’t live in every country, so if you haven’t seen them on your Android or iPhone yet don’t worry! They’ll be coming soon.
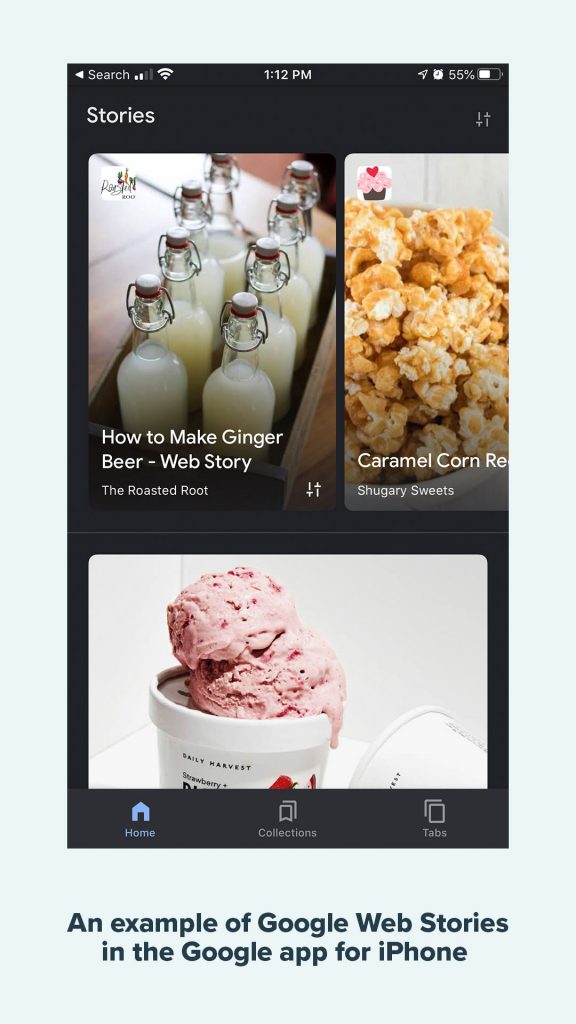
Here’s an example on an iPhone:
Over the Christmas holiday I had the opportunity to play around with Web Stories and see how they can drive traffic to a site right away, which is huge! A part of Google you can affect right now.
The best way to explain Web Stories is… imagine if your highly-ranked blog post and Instagram stories had a baby. You’ve now got an evergreen, extremely visual and interactive way to reach someone interested in a specific topic.
Unlike those other platforms, let me say again – Web Stories are meant to be evergreen, or live forever. That means they should tell a full story on their own, for the best user experience.
As Eric described in his post, you can also think of a Web Story as preview for your post content, to an entirely new audience.
From Mediavine’s perspective, ideally any Web Story will be compelling enough to get the viewer from the Story to your actual blog post.
This will earn much more money for you as opposed to being served AMP ads in a Web Story, though you can potentially do both, depending on your website setup. Make sure you email us if you have questions!
We’d like you to think of this the way you do your newsletter audience; tell them a compelling story, but also get those viewers onto your site to see ads. To us, it’s better to do that than it is to try to monetize this very unique, engaged Web Story space.
The viewers don’t have to follow you; they just have to be interested in the topic you’ve got a Web Story about.
According to Google, “You’ll find more videos and fresh visual content, as well as evergreen content — articles and videos that aren’t new to the web, but are new to you.”
To me, that means the Story lives forever, so if the content you’re planning a Story around is evergreen, make sure that Story is timeless, or update it often for seasonality.
It is possible you’ll see a Story “drop out” of popularity overnight, but that may mean the search trend is done for the season on the Story’s topic. It doesn’t mean the Story will never be served again, or that it won’t become relevant again when the search trend picks back up again.
Web Stories can be used by any type of blogger, around any type of content. The first thing I suggest is using Google Discover to see how other content creators are using Stories.
For example, Google mentions Refinery29 in their blog post about the best Web Stories.
There are fabulous clues for how to make evergreen content that resonates with an interested Discover reader, no matter when they’re served the Story — today or next holiday season.
And, as Eric pointed out, having Web Stories for articles you already rank well for can remind Google that you’re an expert in the topic and may even help you rise higher in search results, which might then help your content show up more often in Discover.
It’s important to remember that a Web Story should be a solid piece of content that can stand on its own. Tell the full story, even if you want to compel readers to visit your site too.
CONTENT IS STILL KING.
There are a couple ways to make a Web Story. There are third-party apps like Jumprope that cater specifically to Google Web Stories, and if you’re using a non-WordPress CMS to run your blog, you’ll need to use one of those.
For WordPress users, there is an official plugin that was released by Google itself, and that is what I’m here to teach you about today!
I’m going to assume that you’ve already read Eric’s post, set up a separate Google Analytics profile for your stories and excluded the _gl parameter from your view settings, downloaded the Web Stories WordPress plugin and are ready to generate UTM codes for each Story’s URL.
If you haven’t, please hit up his post first!
Let’s Get Started!
If you’ve used Photoshop or Canva, you might find the user interface of the Web Stories plugin familiar. I’ve spent years in both, so I found the interface straightforward, if a little clunky and buggy. It’s brand new, so don’t go too hard on ‘em!
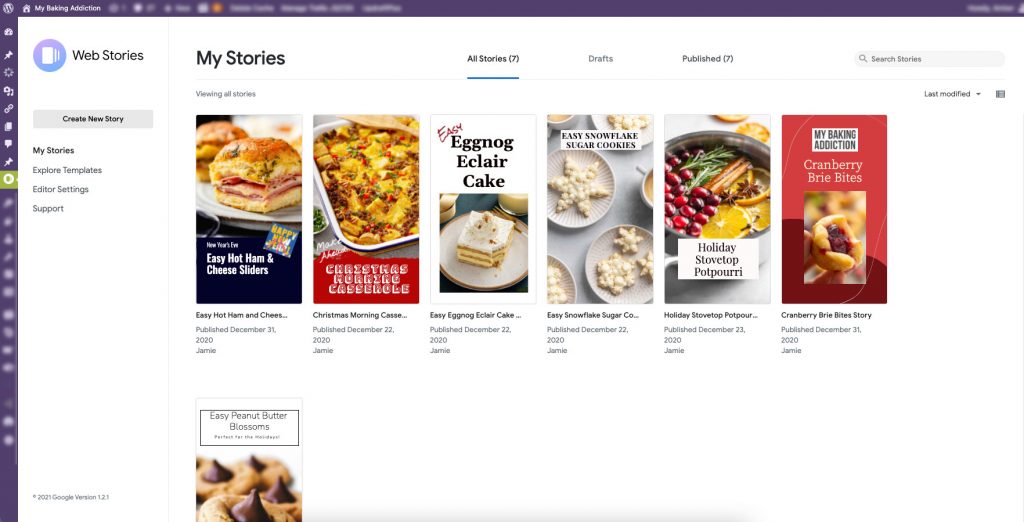
I am a food blogger, so I tell my best stories about food. Since I haven’t blogged in a while, Jamie, our Influencer Marketing Coordinator, was kind enough to let me borrow her blog and content to learn — now I’m sharing our experiments with you.
Here’s Jamie’s Story for Easy Hot Ham and Cheese Sliders that we are going to be making together:
Add A New Story
First things first, name your Story. As Eric said, pick a name for your story that makes sense for your keyword, but is enticing for the reader. It’s the first thing they’ll see, along with your cover image.
The main thing is to avoid Google filtering out one of your results with its “duplicate name” filter, so make sure your Story title is slightly different from your post name.
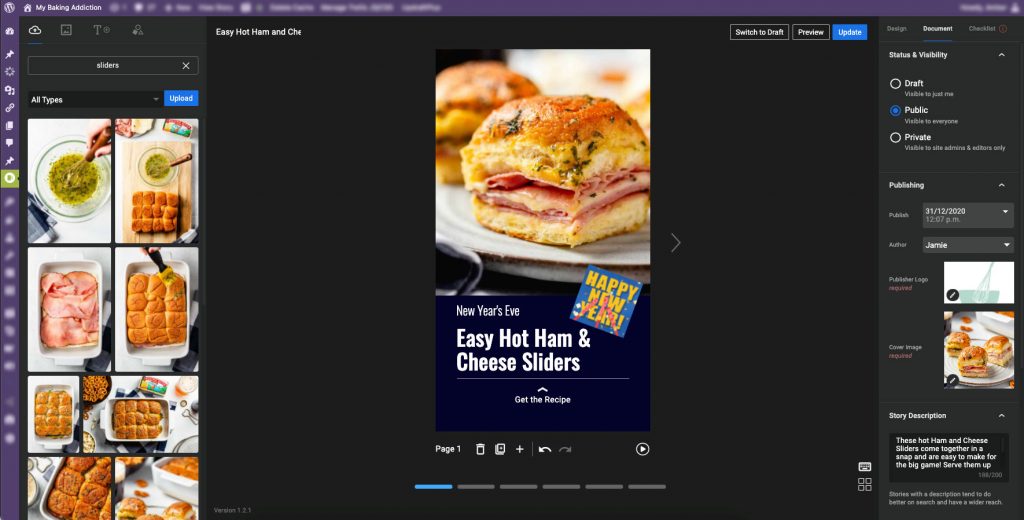
Working In Layers
Photoshop users will be very familiar with the idea of layers, as that’s a key component of design in that program. Each Story slide you’re working on contains its own layers to create dynamic content from slide to slide.
Layers will vary by type, from images to text to shapes to videos, and each layer will get its own settings and details, but each slide you create contains a locked background layer.
You can access any layer’s settings in the Layer Editor by selecting it in the lower right corner. The settings appear in the upper right.
You may need to scroll up and down within the individual settings area to see all the options.
Pro Tip: If you want a call to action or “swipe up” feature on every slide that links to the blog post, set it now on your first slide’s background layer, in the section called Page Attachment. When you duplicate the slide to make your next one, the link will remain and you can delete the other layers and begin fresh. Make sure the link you add here contains a UTM code, so that you can see how much of your traffic to a post is coming directly from a Web Story.
Calls to action take up space (so that they can grab attention!) and putting them in place FIRST helps make sure you’re not creating a slide design that doesn’t work well with where the CTA is placed.
You can’t change the CTA location, so adding it later might mean redesigning the whole slide.
You can create your next slide by “duplicating” your first one, which means the CTA will stay in place as you continue to design.
Layers allow you to work individually with each content piece and move it, change it, etc. without affecting the layers around it unless those layers are selected too.
Adding Text To Slides
Adding text directly to slides using the Web Stories application is best practice. If you upload an image with text already on it, that text will not be accessible for differently-abled viewers. The Web Stories tool makes sure the text is accessible for those viewers.
Remember that Google’s advice is to use roughly 10 words or 280 characters per slide.
Font choices are limited to those Google has provided, but there’s enough here to keep your viewers interested.
I’ll also pull out an old design adage from my college graphic design classes: Don’t use more than three different fonts per slide, and consider that in this small space, two might be your max for great design that readers find appealing.
Access Your Media Library
While Google does recommend photos with a 3:4 aspect ratio, it doesn’t seem to affect the success of the overall performance if you grab what you have in your Media Library and stretch or shrink it to fit.
This is where Canva users will feel some familiarity with the plugin; adding photos is extremely similar.
You can also use Shapes (one of the content layer types) as Masks for your photos. What does that mean?
Place a shape on your slide. Then add a photo from your Media Library and move it around until it’s hovering over the shape. The application should attempt to fit the photo inside the shape. This is another way to get versatile with what the slides look like.
Pro Tip: Make sure there is alt text on any photo you upload. The Stories app should pull in the alt text you’ve already got in WordPress, but if you need to make changes, do so.
Also note: there is an acknowledged bug (confirmed in the WP Support forums) in the Stories app that will tell you there’s no accessible text when there is. Google is actively working to fix this.
Animations & GIFs
Just like when creating a PowerPoint or Google Slides deck, you can quickly and easily add animations to any layer of your slide — this includes photos, text, etc. Doing so can make your story a bit more engaging.
You’ll notice I did this on slide 1 for the ham and cheese sliders, adding a slide-in animation to the post title and a “drop” to the Happy New Year GIF since we were targeting this to New Year searches.
Since then, we’ve updated the story to remove the “New Year” aspect so that if it’s served to new viewers they aren’t considering it outdated.
There are quite a few options to choose from in the Layer editor, and you can even change the amount of time the effect lasts.
My best advice is to play with these things. Preview your Story with guesses as to what will look best and then adjust from there. You’ll find a style and form that works for you and your audience.
Other Features of The Layer Editor
The ability to change alignment, orientation, size, position and opacity are available for each layer, as well as the ability to hyperlink any layer.
Additionally, for text you can change fonts, add fill or highlight behind the text; add borders around text and access all the traditional formatting options like bold, italics and underline; adjust kerning and padding around and between letters; change the color of the text.
For images, you can change the corner radius (to make rounded edges), add a border or link and add accessibility text.
Document Editor
Before you ever publish a Story, you must make sure this section in the Story Editor is filled out completely.
Add your Logo. You can also add this in Story Editor Settings so that it’s automatically there in each Web Story you create.
Add a Poster Image. Typically we pick our favorite vertical hero image from the post.
Story descriptions seem a lot like meta data you would write for post content. You have 200 characters to describe the Story, so use your keyword and make it enticing! According to a sub-note in the Story Editor, “Stories with a description tend to do better on search and have a wider reach.”
Permalinks are automatically created when you type a Story’s name. If you changed the name at any point, or want something different, change the permalink before you publish.
Page advancement! This one is important. It’s how you speed up or slow down auto-advancement of your Story when it is viewed.
I don’t see a reason why anyone would ever choose “manual” here (that means someone has to click or tap the screen to see the next slide), but paying attention to how your Story flows is a good idea. If the advancement is too slow, your viewers might get bored and keep scrolling their Discover feed instead of waiting for your next slide.
If it’s too fast, they can’t read what’s on the slide or have to hold it in position until they’re finished reading, and that’s not a good experience either. Play with this based on your individual Story and what you’ve added content-wise so that it flows in a way that feels good to you.
You’re ready to publish!
Go through the notifications on the Checklist tab and make sure there are no glaring errors that would prevent someone from reaching your Story. Preview your Story to make sure it flows and that the call to action links where you want it to.
Hit Publish. Then, visit the URL for the Web Story and grab the permalink. Go to the original post and link to the Web Story somewhere in your content, where it fits naturally, on the keyword you’re targeting.
Adding a link to even a highly ranking post shouldn’t affect it negatively in SERPs, but you can always roll it back if the change seems to have upset the Google algorithm gods. Internal linking is such an important part of SEO strategy, having the link there should only help, not hurt.
You’ve published your first Story! Hooray!
Now What?
When you view the separate analytics profile set up for Web Stories, you should be able to see what is getting the most traffic. In your main analytics profile, if you’re using UTM codes, you’ll be able to see specifically how your Web Stories are converting into actual pageviews on your website.
It can’t be overstated — converting Google Discover traffic into a pageview on your website is incredibly valuable. Those are dialed in, interested readers already looking for content like yours.
Monetization of Web Stories
Web Stories can be monetized via AMP ads, but our opinion for now is that you’ll get far more value from your reader if you can convert them over to your website to see display ads there.
Web Stories are still in alpha, making monetization currently a very manual process, with not a lot of availability from advertisers.
Web Stories use AMP ads, which mean they’ve currently only got access to AdExchange, rather than having competition from a multitude of partners like your website display ads. Less competition means lower CPMs.
The AMP ads are only allowed to appear once every seven slides — which means your Story would have to be at least that long to serve even one ad.
Given that Stories are only live in the US, India and Brazil, advertising competition and availability will be even further diminished, meaning ROI on running an ad in your stories is hardly worth it. Get viewers to your website instead through quality story-telling.
Make sure you’re running Grow to capture them as logged-in users who favorite your content and they’ll be even more valuable — and very likely repeat readers.
I am hopeful that this inspires you to create your own Story, no matter what kind of content you Create.
About the author
Share this page